
Ultra96 Setup#
AMD-Xilinx Zynq Architecture#
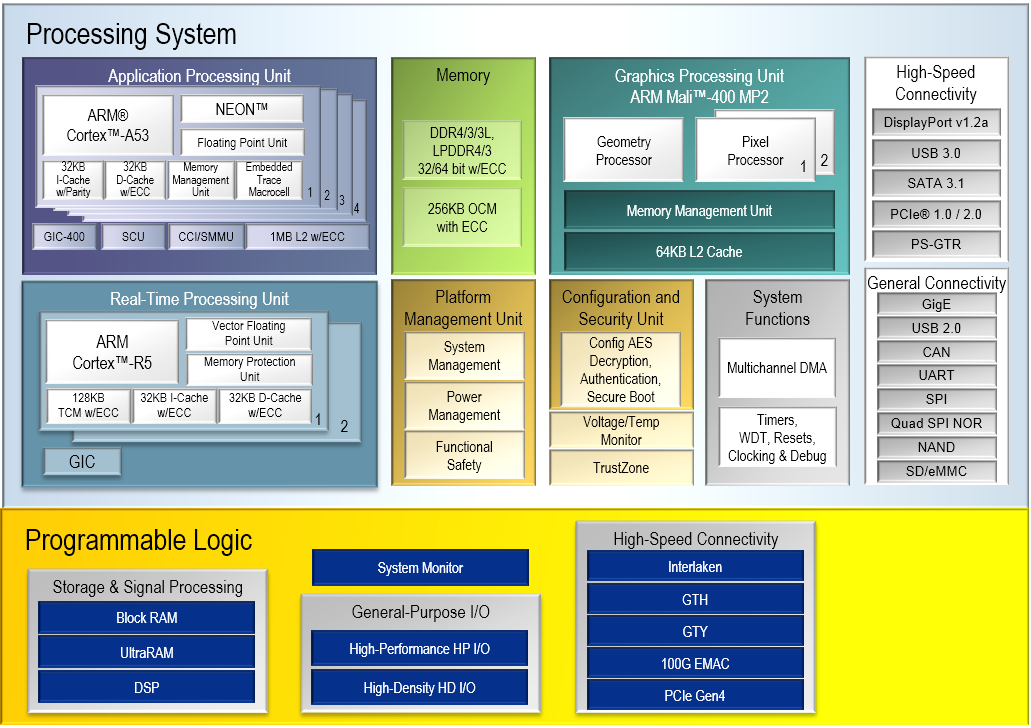
Fig. 3 AMD-Xilinx Zynq UltraScale+ MPSoC diagram#
Ultra96 v2 board features Xilinx Zynq UltraScale+ MPSoC. Zynq UltraScale+ MPSoC is a heterogeneous SoC that consists of Processing System (PS) and Processing Logic (PL). PS includes the quad-core ARM Cortex A53-based APU (Application Processing Unit) and the dual-core ARM Cortex R5-based RPU (Real-Time Processing Unit). PL refers to FPGA hardware resources LUTs (Look-Up Tables), FFs (Flip-Flops), Block RAMs, DSPs, etc. In this lab, we will first run Linux on the A53, and we will divide the computation into threads that run on different cores.
Environment Setup#
Setting up Ultra96 and Host Computer#
We have provided you with:
An Ultra96 board with a power cable and a JTAG USB cable
2 USB-ethernet adapters
1 ethernet cable
1 SD card and an SD card reader
USB-C to USB 3.1 adaptor (for those of you who only have USB-C ports in your computer)
Caution
Your board should be preassembled, but please still be cautious with ESD protection when using the JTAG module with Ultra96. The Ultra96 has exposed pins on the UART and JTAG headers. - https://www.avnet.com/opasdata/d120001/medias/docus/190/5362-PB-AES-ACC-U96-JTAG-V3b.pdf
Your setup for this HW should look like Fig. 4. Note that the USB to Ethernet adapter should be plugged into the USB port closest to the corner of the board.
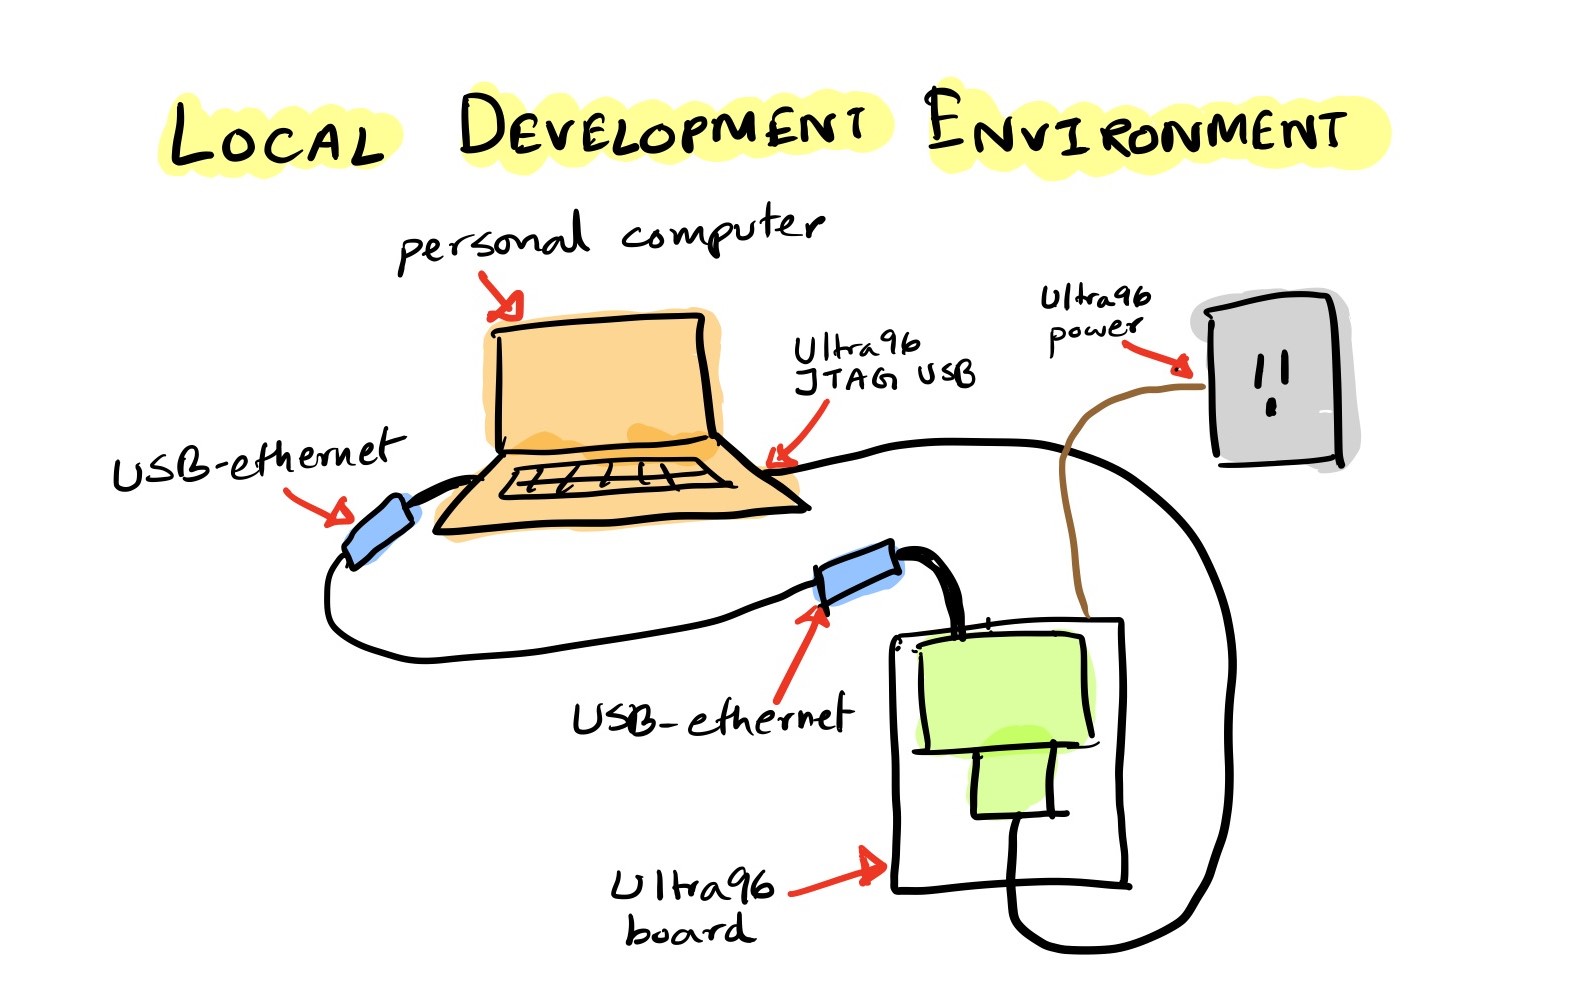
Fig. 4 Development Environment#
Run on the FPGA#
Write the SD Card Image#
Download a sample SD card image for Ultra96 from sample SD card image.
Write
sd_card.imgto your SD card.In Ubuntu 20.04, you can use
Startup Disk Creator.You can also use Rufus or balenaEtcher.
Once you finish writing the image to the SD card, slide it into your Ultra96’s SD card slot.
Resize the SD Card Partition (Optional)#
The default partition size for root is quite small from the image. If you are running out of space, you may want to resize the partition to use the full capacity of your SD card. To do this on Linux, first insert the SD card into your computer, and then run:
lsblk
You should see output similar to below:
NAME        MAJ:MIN RM   SIZE RO TYPE MOUNTPOINTS
sda           8:0    1  29.8G  0 disk
├─sda1        8:1    1   976M  0 part
└─sda2        8:2    1   2.5G  0 part
nvme0n1     259:0    0 931.5G  0 disk
├─nvme0n1p1 259:1    0     2G  0 part /boot
└─nvme0n1p2 259:2    0 929.5G  0 part /
In this example, the SD card is
sda, as indicated by its size and the fact that it has two partitions.sda1is the boot partition, andsda2is the root partition, which we want to resize.Caution
Make sure you are resizing the correct partition. In this example the SD card is
sda, but it may be different on your computer. If you resize the wrong partition, you may lose data!You can resize the root partition using
gpartedorparted. For example, to resize the root partition to use the full capacity of the SD card, you can run:sudo parted /dev/sda (parted) resizepart 2 100% (parted) quit
Alternatively, you can use
growpartto resize the partition (note the space between/dev/sdaand2):sudo growpart /dev/sda 2
Then, you can resize the filesystem on the root partition using
resize2fs:sudo resize2fs /dev/sda2
Run
lsblkagain to verify that the root partition has been resized.NAME MAJ:MIN RM SIZE RO TYPE MOUNTPOINTS sda 8:0 1 29.8G 0 disk ├─sda1 8:1 1 976M 0 part └─sda2 8:2 1 28.9G 0 part nvme0n1 259:0 0 931.5G 0 disk ├─nvme0n1p1 259:1 0 2G 0 part /boot └─nvme0n1p2 259:2 0 929.5G 0 part /
Boot the Ultra96 (Environment - Personal Computer with Linux)#
The instructions here are for users running Linux on their personal computers. For Windows and Mac users, skim these through, and then go to Boot the Ultra96 (Environment - Personal Computer or Detkin Machines with Windows) or Boot the Ultra96 (Environment - Mac).
Make sure you have the board connected as shown in Fig. 4.
We will use two terminals on our host computer:
the first terminal will be used to copy binaries onto the Ultra96
the second terminal will be used to access the serial console of the Ultra96
We will now open the serial console of the Ultra96. You can use any program like
minicom,gtktermorPuTTYto connect to our serial port. We are usingPuTTYand launchPuTTYbysudo putty. The settings are shown in Fig. 5./dev/ttyUSB1is the port where the Ultra96 dumps all the console output. If you are on Windows, this will be something different, likeCOM4.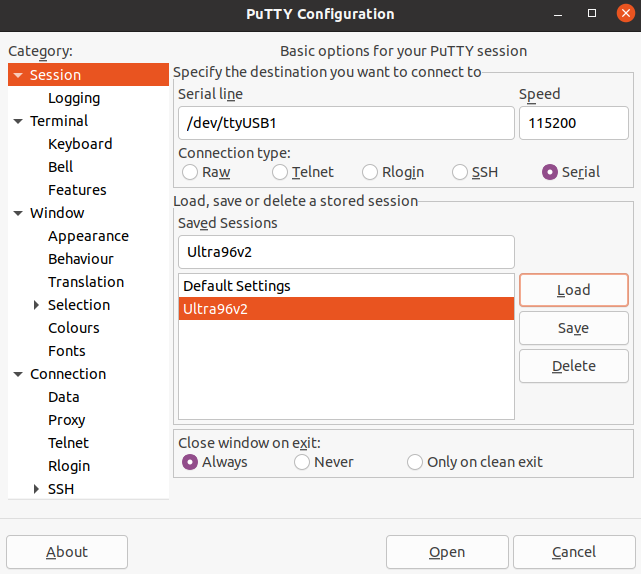
Fig. 5 PuTTY settings#
After you have connected to the serial port, boot the board by pressing the boot switch as shown in
boot.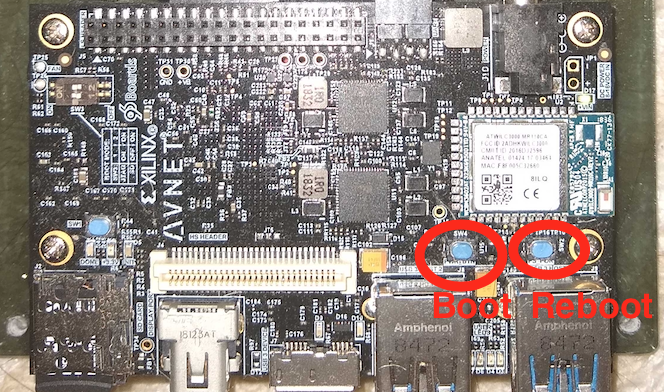
Fig. 6 Switch for booting Ultra96#
Watch your serial console for boot messages. Following is what ours look like:
NOTICE:  BL31: Non secure code at 0x8000000
NOTICE:  BL31: v2.10.0	(release):v1.1-13187-g4f82b6134
NOTICE:  BL31: Built : 04:45:53, Mar 12 2024


U-Boot 2024.01 (May 14 2024 - 03:31:48 +0000)

CPU:   ZynqMP
Silicon: v3
Chip:  zu3eg
Board: Xilinx ZynqMP
DRAM:  2 GiB
.
.
.
Starting kernel ...

[    0.000000] Booting Linux on physical CPU 0x0000000000 [0x410fd034]
[    0.000000] Linux version 6.6.10-xilinx-v2024.1-g2a9895f4630b (oe-user@oe-host) (aarch64-xilinx-linux-gcc (GCC) 12.2.0, GNU ld (GNU Binutils) 2.39.0.20220819) #1 SMP Sat Apr 27 05:22:24 UTC 2024
[    0.000000] KASLR disabled due to lack of seed
[    0.000000] Machine model: xlnx,zynqmp
[    0.000000] earlycon: cdns0 at MMIO 0x00000000ff010000 (options '115200n8')
[    0.000000] printk: bootconsole [cdns0] enabled
.
.
.
[  OK  ] Started Xinetd A Powerful Replacement For Inetd.
[  OK  ] Finished Permit User Sessions.
[  OK  ] Started Getty on tty1.
[  OK  ] Started Serial Getty on ttyPS0.
[  OK  ] Reached target Login Prompts.
[  OK  ] Started Target Communication Framework agent.
[  OK  ] Started Network Time Service.
         Starting Hostname Service...
[  OK  ] Started Hostname Service.
[  OK  ] Finished Access point for Ultra96.
[  OK  ] Reached target Multi-User System.
[  OK  ] Reached target Graphical Interface.
         Starting Record Runlevel Change in UTMP...
[  OK  ] Finished Record Runlevel Change in UTMP.

********************************************************************************************
The PetaLinux source code and images provided/generated are for demonstration purposes only.
Please refer to https://xilinx-wiki.atlassian.net/wiki/spaces/A/pages/2741928025/Moving+from+PetaLinux+to+Production+Deployment
for more details.
********************************************************************************************
PetaLinux 2024.1+release-S05201002 u96v2-sbc-base-2024-1 ttyPS0

u96v2-sbc-base-2024-1 login: root (automatic login)

root@u96v2-sbc-base-2024-1:~#
You should be automatically logged in as
rootwith Password:root. If not, login asrootwith Password:root.root@u96v2-sbc-base-2024-1:~#
We will now enable ethernet connection between our Ultra96 and the host computer, such that we can copy files between the devices. Issue the following command in the serial console:
ifconfig eth0 10.10.7.1 netmask 255.0.0.0
Now in your second console on the host computer, first find out the name that has been assigned to the USB-ethernet device by issuing
ifconfigenx000ec6c4b500: flags=4163<UP,BROADCAST,RUNNING,MULTICAST> mtu 1500 inet 10.10.7.2 netmask 255.0.0.0 broadcast 10.255.255.255 ether 00:0e:c6:c4:b5:00 txqueuelen 1000 (Ethernet) RX packets 213 bytes 32750 (32.7 KB) RX errors 0 dropped 0 overruns 0 frame 0 TX packets 249 bytes 25958 (25.9 KB) TX errors 0 dropped 0 overruns 0 carrier 0 collisions 0 lo: flags=73<UP,LOOPBACK,RUNNING> mtu 65536 inet 127.0.0.1 netmask 255.0.0.0 inet6 ::1 prefixlen 128 scopeid 0x10<host> loop txqueuelen 1000 (Local Loopback) RX packets 570887 bytes 920673672 (920.6 MB) RX errors 0 dropped 0 overruns 0 frame 0 TX packets 570887 bytes 920673672 (920.6 MB) TX errors 0 dropped 0 overruns 0 carrier 0 collisions 0In our case, the USB-ethernet device is
enx000ec6c4b500. Now issue the following command:sudo ifconfig enx000ec6c4b500 10.10.7.2 netmask 255.0.0.0
We have now assigned IP
10.10.7.1to our Ultra96 and IP10.10.7.2to our USB ethernet device connected to our host computer. You can test the connection by doingping 10.10.7.2from the Ultra96 serial console, and doingping 10.10.7.1from the host computer.Unfortunately, currently every time you boot your Ultra96, you will have to login via serial and configure the IP address, before you can connect via ssh. To fix this, create a new file on your host computer
.profile(make sure you don’t do this in your home directory, or else you may overwrite an existing one). In.profile, add the following:ifconfig eth0 10.10.7.1 netmask 255.0.0.0
Then create another file (also not in your home directory), called
.bashrc, and add the following:source .profile
Next, copy these files over to the Ultra96:
scp .profile .bashrc root@10.10.7.1:/home/root/
Now when the Ultra96 boots, you should be able to connect directly over ssh without having to configure the board via serial.
Boot the Ultra96 (Environment - Mac)#
First install the USB to Ethernet driver from here. Then install this serial terminal from here. After installing ASIX, open it and press “Activate”.
Make sure you have the board connected as shown in Fig. 4.
We will use two terminals on our host computer:
the first terminal will be used to copy binaries onto the Ultra96
the second terminal will be used to access the serial console of the Ultra96
We will now open the serial console of the Ultra96. Open CoolTerm and click
options. Then UnderSerial Portchooseusbserial-1234_oj11. Set the baudrate to 115200. Then under Data Handling, selectHandle BS and DEL Characters. Then press okay. Then clickConnectto open up the port.After you have connected to the serial port, boot the board by pressing the boot switch as shown in
boot.
Fig. 7 Switch for booting Ultra96#
Watch your serial console for boot messages. Following is what ours look like:
NOTICE:  BL31: Non secure code at 0x8000000
NOTICE:  BL31: v2.10.0	(release):v1.1-13187-g4f82b6134
NOTICE:  BL31: Built : 04:45:53, Mar 12 2024


U-Boot 2024.01 (May 14 2024 - 03:31:48 +0000)

CPU:   ZynqMP
Silicon: v3
Chip:  zu3eg
Board: Xilinx ZynqMP
DRAM:  2 GiB
.
.
.
Starting kernel ...

[    0.000000] Booting Linux on physical CPU 0x0000000000 [0x410fd034]
[    0.000000] Linux version 6.6.10-xilinx-v2024.1-g2a9895f4630b (oe-user@oe-host) (aarch64-xilinx-linux-gcc (GCC) 12.2.0, GNU ld (GNU Binutils) 2.39.0.20220819) #1 SMP Sat Apr 27 05:22:24 UTC 2024
[    0.000000] KASLR disabled due to lack of seed
[    0.000000] Machine model: xlnx,zynqmp
[    0.000000] earlycon: cdns0 at MMIO 0x00000000ff010000 (options '115200n8')
[    0.000000] printk: bootconsole [cdns0] enabled
.
.
.
[  OK  ] Started Xinetd A Powerful Replacement For Inetd.
[  OK  ] Finished Permit User Sessions.
[  OK  ] Started Getty on tty1.
[  OK  ] Started Serial Getty on ttyPS0.
[  OK  ] Reached target Login Prompts.
[  OK  ] Started Target Communication Framework agent.
[  OK  ] Started Network Time Service.
         Starting Hostname Service...
[  OK  ] Started Hostname Service.
[  OK  ] Finished Access point for Ultra96.
[  OK  ] Reached target Multi-User System.
[  OK  ] Reached target Graphical Interface.
         Starting Record Runlevel Change in UTMP...
[  OK  ] Finished Record Runlevel Change in UTMP.

********************************************************************************************
The PetaLinux source code and images provided/generated are for demonstration purposes only.
Please refer to https://xilinx-wiki.atlassian.net/wiki/spaces/A/pages/2741928025/Moving+from+PetaLinux+to+Production+Deployment
for more details.
********************************************************************************************
PetaLinux 2024.1+release-S05201002 u96v2-sbc-base-2024-1 ttyPS0

u96v2-sbc-base-2024-1 login: root (automatic login)

root@u96v2-sbc-base-2024-1:~#
You should be automatically logged in as
rootwith Password:root. If not, login asrootwith Password:root.root@u96v2-sbc-base-2024-1:~#
We will now enable ethernet connection between our Ultra96 and the host computer, such that we can copy files between the devices. Issue the following command in the serial console:
ifconfig eth0 10.10.7.1 netmask 255.0.0.0
Now on your Mac, open up SystemPreferences->Network, and then you should see AX88179 show up in the connections box. After pressing “Details”, under TCP/IP tab, configure the AX88179 from “Using DHCP” to “Manual”. Then set the IP address to 10.10.7.2 and the subnet mask to 255.0.0.0
We have now assigned IP
10.10.7.1to our Ultra96 and IP10.10.7.2to our USB ethernet device connected to our host computer. You can test the connection by doingping 10.10.7.2from the Ultra96 serial console, and doingping 10.10.7.1from the host computer.Unfortunately, as it stands, every time you boot your Ultra96, you will have to login via serial and configure the IP address, before you can connect via ssh. To fix this, create a new file on your host computer
.profile(make sure you don’t do this in your home directory, or else you may overwrite an existing one). In.profile, add the following:ifconfig eth0 10.10.7.1 netmask 255.0.0.0
Then create another file (also not in your home directory), called
.bashrc, and add the following:source .profile
Next, copy these files over to the Ultra96:
scp .profile .bashrc root@10.10.7.1:/home/root/
Now when the Ultra96 boots, you should be able to connect directly over ssh without having to configure the board via serial.
Boot the Ultra96 (Environment - Personal Computer or Detkin Machines with Windows)#
Connect your ultra96 jtag usb to your computer. Also connect the ethernet-usb to ultra96 and the computer. Go to device managers and note down the serial port of the usb. In the example case, it’s COM4.
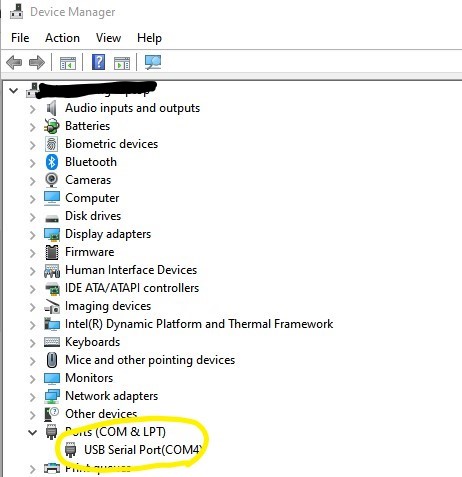
Fig. 8 Find the port#
Download and install MobaXterm from here. In Detkin/Ketterer machines, use the portable version since you don’t have a permission to install the software.
Start MobaXterm. Click Session in the left top corner and select Serial. Set the serial port as the one you found in the previous step and bps. In the example case, it’s COM4 and 115200. Click OK.
Boot the board by pressing the boot switch as shown in
boot.Note that near the end some messages spill, so just press Enter couple of times, and you see that you need to login. Login as
rootwith Password:root.root@u96v2-sbc-base-2024-1:~#
Click plus sign to open up the local machine’s session(new tab). Type
ifconfigand find out the ip address and netmask assigned to the USB-ethernet device. Following is the example: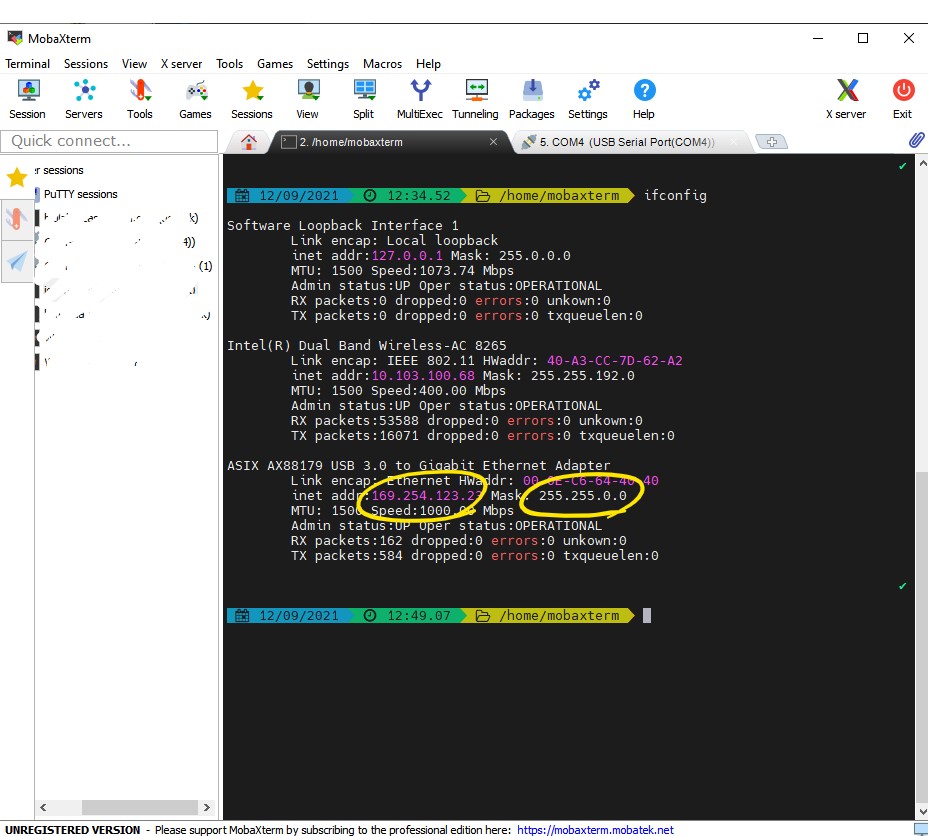
Fig. 9 ifconfig to find out your local machine’s ip#
Assign your Ultra96 an ip address on the same subnet as the USB-ethernet, e.g. from the previous step, the ip address of the local machine is
169.254.123.23and netmask is255.255.0.0. So, let’s assign the ultra96 to a ip of169.254.123.24(note that this is 24!) as follows: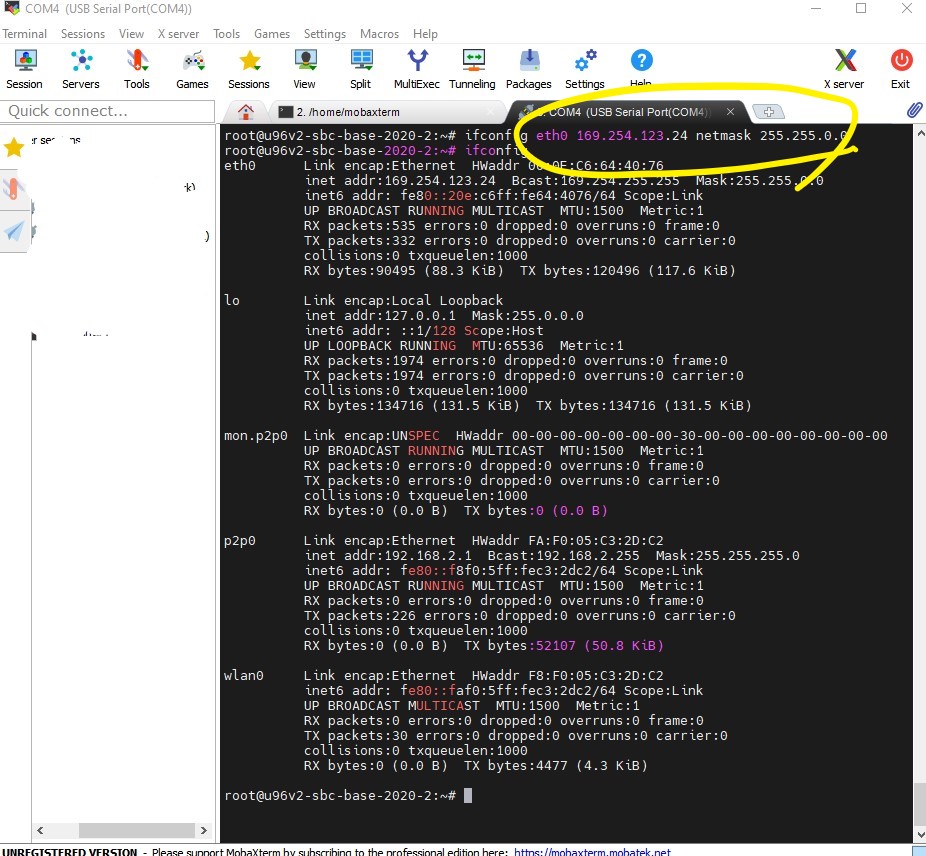
Fig. 10 Connect you machine and Ultra96#
Your devices are now connected. Go to the local machine’s tab and ssh into the Ultra96:
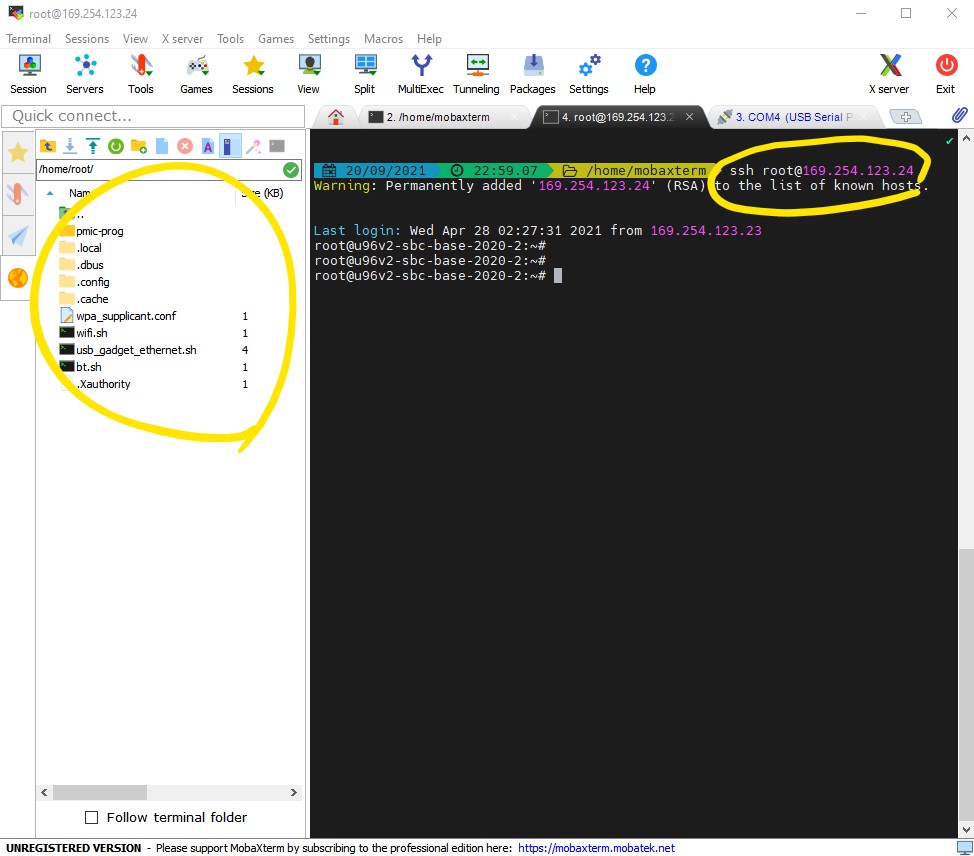
Fig. 11 ssh in to the Ultra96 and transfer files#
You can view the files of the Ultra96 on the left hand side. You can easily drag and drop files from/to the local machine to/from Ultra96.
Unfortunately, currently every time you boot your Ultra96, you will have to login via serial and configure the IP address, before you can connect via ssh. To fix this, create a new file on your host computer
.profile(make sure you don’t do this in your home directory, or else you may overwrite an existing one). In.profile, add the following:ifconfig eth0 put-your-ip-address-here netmask 255.255.0.0
Where
put-your-ip-address-hereis the ip you set in the previous step (in the example it was169.254.123.24). Then create another file (also not in your home directory), called.bashrc, and add the following:source .profile
Next, drag and drop these files over to the Ultra96 in /home/root/. Now when the Ultra96 boots, you should be able to connect directly over ssh without having to configure the board via serial.
Remote SSH via VSCode (not recommended)#
Using Remote SSH in VSCode to write code directly on your board can be convenient. However, Remote SSH installs a server on the board during tunnel setup, which consumes significant space. Given the limited storage capacity of SD cards you will get, this can lead to space constraints when you need additional files or further compilation. To avoid this, it is recommended to develop locally on your host computer and ‘scp’ files to the board.